‘how to’ cookers & ovens

Our Easy Guide to 10 Common Oven Symbols & Functions

Our Easy Guide to 10 Common Oven Symbols & Functions

Have you ever looked at all the symbols on your oven and wondered what they actually all do? Most of us buy an oven with the hopes that it will serve us well for years to come, which is why maintaining your oven properly is essential. What’s more, you ideally want your oven to have all the cooking functions you need – but what oven symbols mean what?

Here, we’ve put together a full guide what what the oven symbols your oven has mean:

See our complete list of oven symbols below…

Ovens cooking functions are displayed on the front panel via symbols. Understanding these oven symbols is not only important for successful cooking but also important to keep your oven in good nick. Using them incorrectly could cause your oven to trip or fuses to blow and that’s a major inconvenience, even if you have good oven insurance.

To help you understand the various oven symbols and their baking/cooking functions, here are the ten commonly used symbols.
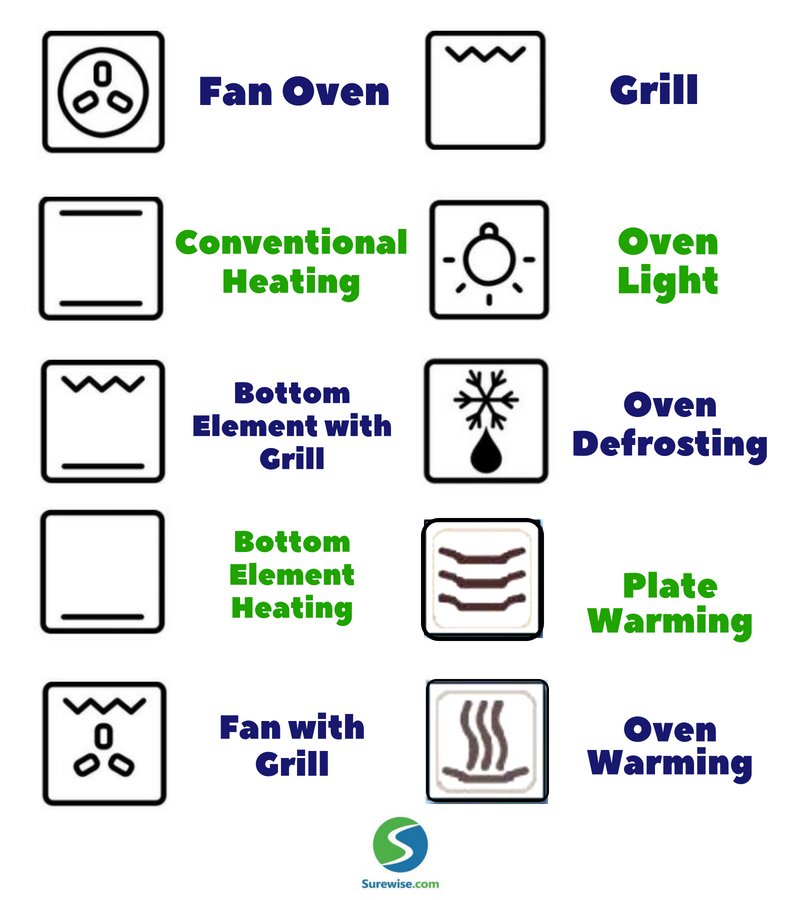
1. Fan oven

A fan in a circle represents an oven that uses a fan to distribute heat generated from a circular element that surrounds the fan. Ideally, the heat distribution should be even, so that it doesn’t matter where the food is placed in the oven, it cooks perfectly every time.

Fan ovens are designed to heat up faster, reduce cooking time and decrease energy consumption. Fan ovens are great for baking multiple trays at a time (biscuits, cupcakes and muffins on the top, middle and lower shelves respectively). They’re also recommended if you like your meat cooked the ‘chefy’ way, tender on the outside and rare on the inside.

If you have a combination oven and you want to use the fan, then the symbol won’t have a circle around the fan.

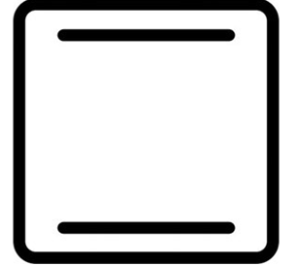
2. Conventional heating

The symbol for conventional heating is two lines, one at the top and one at the bottom of a square. The lines represent the two heating elements used, one at the top and one at bottom of the oven. Instead of a fan, the heat is diffused by natural convection. Use the conventional heating mode for roasting meat and vegetables or baking cakes.

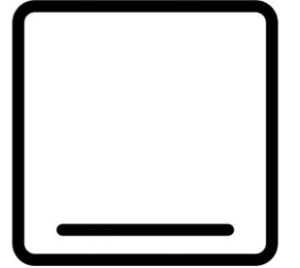
3. Bottom element heat

The symbol is a single line at the bottom of a square, which represents the lower heating element in use. This method is ideal for baking something that requires a crispy base such as pizza. It is also used for baking a casserole.

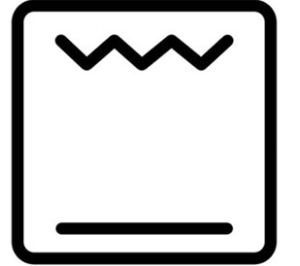
4. Bottom element heating with grill

The symbol for this function is the zigzag (grill) line at the top and a straight line at the bottom of a square. It’s a good function to use for cooking pies, quiches, and crisping pizzas.

5. Fan with grill

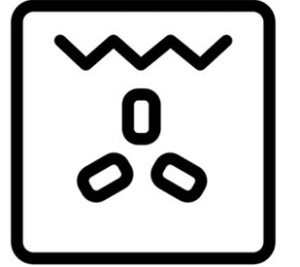
The symbol is the zigzag line at the top of a square with the fan symbol underneath. The fan distributes the heat, while the grill roasts from the top. The grill cycles on and off to maintain the temperature setting. This method is ideal for cooking meat and poultry.
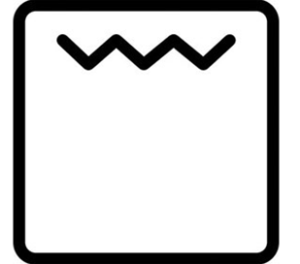
6. Grill

The symbol is simply a zigzag line at the top of a square. Using the full grill allows you to cook food for virtually your whole family plus guests. There may also be a half-grill setting, which means only the centre of the grill element gets hot. You’ll need to place food dead centre to get even cooking. Grills ate great for crisping and browning food, so use yours to make toast or toasted sandwiches, melt and brown cheese on lasagne and make delectable mushroom steaks.
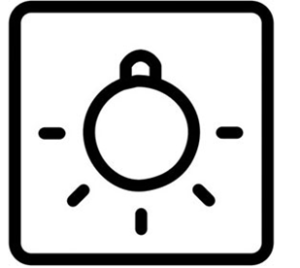
7. Oven light

Rather obviously, the symbol is a light bulb in a square. Some ovens cook with the light on automatically so you can see progress easily, but other ovens have a light switch so that you have to turn it on and off to see what’s potting.
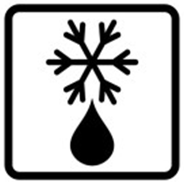
8. Oven defrosting

Not all ovens have a defrost function, but if yours does, you’ll see it on the symbol that looks like a snowflake above a drop of water. In this mode, the oven fan is switched on but no heat is generated. The air circulation defrosts the food. It’s great if you forgot to take food out to defrost overnight and you need to make a plan quickly.


9. Warming oven

The symbol is a dish with ‘steam’ lines rising above it. Use the function to keep food warm, without cooking it anymore. Food should stay moist and not dry out when using the warming function.

10. Plate warming

The symbol for this function is three dishes lined horizontally above one another. Dinner party etiquette dictates that you must serve plates warm. This setting keeps your plates safely warm without damaging the china.

Need Home Appliance Insurance?Why Surewise.com Benefits Reviews & FeedbackGet a Quote

Oven Symbols Guide:

Posted by Surewise in Appliance Insurance Articles

Discover Our 3 Quick and Easy Oven Cleaning Home Remedies

3 Quick and Easy Oven Cleaning Home Remedies

Cleaning the oven is undoubtedly one of the most difficult aspects of keeping the kitchen looking pristine. Often it takes a great deal of physical strength to get the grease and grime off an extensively used oven. Worse still are the harmful smells of industrial-strength oven cleaners available in the market. Popular oven cleaners have highly caustic chemical such as butane and sodium hydroxide that can be hazardous to your family’s health.

The good news is that there are effective homemade solutions for oven cleaning that are safer not only for you but also for the environment. If your oven does not have a self-cleaning function, here are three relatively chemical-free ways of keeping your oven sparkling clean.

1. Baking soda with water

Use water and large quantities of baking soda to make a paste. The baking soda paste does not have an unpleasant odour like the harsh oven cleaners available in the market. Apply generous amounts of the paste to the walls and doors of your oven using a cloth. Spread the paste evenly. Let the paste remain for a couple of hours. This softens the stains, which can now be removed using a wallpaper scraper. Use a soft cloth dipped in warm water to wipe clean any residual paste and stains on the oven. Your oven will now be sparkling clean.

2. Lemon juice with water

Citrus oils have natural degreasing properties. Cut two lemons and squeeze the juice onto a baking dish that is one-third full of water. Place the lemon pieces in the dish as well and put the dish in the oven at a low temperature for about half-an hour (or longer depending on the state of the oven). The vapours from the lemon solution loosen the grime stuck on the oven walls. Turn off the oven, remove the baking dish, and let the oven cool. Remove the grime in the oven using a scouring pad, the same lemon solution, and a sponge. Wipe dry with a soft cloth. This technique is great for cleaning convection ovens.

3. Baking soda and vinegar

Spray vinegar inside the oven and sprinkle baking soda over it.  Allow the mixture to fizz for 30 minutes to an hour depending on how bad the grime situation is. Like the lemon juice method, scrub the walls and base of the oven using a scouring sponge. Since vinegar is a great degreaser, dip the sponge in vinegar as you scrub.  Wipe clean the oven using water and a soft cloth.

If you have been using chemical oven cleaners, perhaps it is time you tried one of these homemade oven-cleaning solutions that are safer for your family as well as the environment.

Need Home Appliance Insurance? – Cover for all your home appliances Click Here for a quote!
Posted by Surewise in Appliance Insurance Articles

Simple Tips for Safe Hob Cleaning

Simple Tips to Safely Clean your Hob

The hob is often a place you prepare food every day, so it’s an essential place in your home to keep clean. The best way to ensure that the hob & cooker area is hygienic is to wipe after each use when any food residue or stains are still fresh.

Despite doing this, it’s still possible for a layer of oil and grime to settle on your hob. Depending on which type of cooker you have, using the right cleaning agents and tools can help you remove this stubborn material with relative ease.

Hob cleaning products and tools

You will find a wide range of cleaning products in the supermarkets specifically for the kitchen. For ease of use look for products that come in spray bottles. Alternatively, instead of using cleaning liquids with strong chemicals, you can try using some of the more natural hob cleaning products that are better for your health, as well as for the environment.

In addition, before you clean the hob, it would be helpful to have the following cleaning tools on hand:

  • Rubber gloves to protect your skin
  • A blunt blade or plastic scraper available at hardware stores, to remove the softened food residue ( after using the stain remover)
  • A scrubbing brush with a medium bristle
  • A microfiber cloth to clean the hob and give it a good smear-free shine

Cleaning the hob

Hob cleaning techniques differ depending on whether you have a gas, ceramic, enamel or a combination cooker.

  • Enamel hobs are relatively easy to maintain as they can take some forceful cleaning. Use a blunt blade to remove the stains, while being careful not to scrape the curved surface of the hob.
  • Ceramic and induction hobs are more prone to scratches and therefore need to be tackled carefully. Use a plastic scrapper to remove the grunge. In case of the ceramic hob, prevention really is the best cure. Wipe off any spills as soon as they happen.
  • The majority of the gas hobs have an aluminium base. Soak the base and burner lids in soapy warm water for a while. Clean the base with a scouring pad to remove the grime. Enamel burner lids can also be cleaned the same way.
  • A stainless steel hob should be cleaned rather gently. Clean the hob using a microfibre cloth and a mild bicarbonate of soda solution. To maintain your cooker, never leave any food residue on the hob as it can easily create permanent stains on the stainless steel surface.
  • Cleaning a hob with cast iron racks can be cumbersome. Wash the racks in a warm soapy water solution in a dipping tray. Use soda crystals and a wire wool to scrub clean the racks. Avoid washing them in the dishwasher as the salty dishwater can cause them to rust.

Whenever you clean your hob, follow basic safety tips.  If you are cleaning the hobs with a chemical based cleaner, then keep kitchen windows open for ventilation. Also, wear gloves and goggles for protecting your hands and eyes.

Need Home Appliance Insurance? – Cover for all your home appliances Click Here for a quote!
Posted by Surewise in Appliance Insurance Articles

Please Follow Cooker Safety Regulations

Please Follow Cooker Safety Regulations;

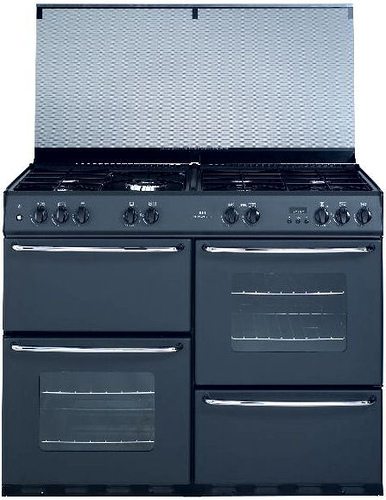
You should always install a gas cooker with great care. Things can terribly go wrong if the cooker is improperly installed, or if you don’t have thorough knowledge of cooker safety regulations

As the buyer of the appliance you are not expected to know cooker installation regulations; you should, however, be aware of them so you can buy a cooker that is right for your home. Your new cooker should come with the manufacturer’s installation instructions, if it doesn’t please insist on having them.  Read these carefully before you call a certified engineer to install the cooker in your home.

To help you, here is a list of general cooker safety regulations:

  1. All gas cookers must be installed only by a Gas Safe registered engineer.
  2. Ensure that you have adequate space in the kitchen for a freestanding cooker with a high-level grill. This is because all such appliances must have a minimum clearance above the grill. Also, there should be a minimum clearance, provided in the installation instructions for either side of the appliance.
  3. In the case of gas or electric hobs, there is frequently a minimum overhead gap of 750mm.  Any wall units built on either side of the hood and either side of the hob will also have minimum clearances given by the manufacturer.  The should be checked against building regulations by your qualified installer.
  4. All cookers must have an inbuilt flame failure device. The flame failure device is part of the gas burner system. The device cuts off the gas supply if the cooker flame extinguishes for any reason. This safety feature is especially important if you stay in a flat or a multi-dwelling building (such as a flat above a shop).
  5. Under the Gas Safety Installation and Use Regulations (1998), if you are a landlord it is your legal responsibility to ensure that a Gas Safe Registered engineer certifies all gas appliances in the house annually. If you are a tenant it is your responsibility to ensure that your landlord obtains the gas safety certificate; it is essential for the safety of your family. Depending on the number of gas appliances on the property, the certification process may take between thirty minutes to an hour.

A word of warning

An incorrectly installed cooker may affect the product guarantee, as well as your insurance policy. Worst still, if you don’t have the annual Gas Safe Certificate for your property it could invalidate your household insurance claim.

Need Home Appliance Insurance? – Cover for all your home appliances Click Here for a quote!
Posted by Surewise in Appliance Insurance Articles